How To Roast Corn In The Oven With Husk And Butter
Roasting corn in the oven with husk and butter is one of the easiest ways to get perfectly juicy, smoky corn on the cob every single time. This method keeps the natural moisture locked inside the husk, giving you tender kernels with a hint of char. You do not need a grill or any fancy equipment. Just your oven, some butter, and fresh ears of corn. Follow our simple guide and you will have oven roasted corn that beats takeout any day.
There is something magical about corn on the cob fresh off the heat. The kernels burst with sweetness, the texture is tender, and the flavor is deep and satisfying. When you roast corn in the oven with husk, you get all of that without standing over a hot grill. This method is simple, reliable, and delivers results that will wow your family and friends.
Many people think roasting corn requires a barbecue or a fire pit. That is not true at all. Your home oven can do the same job with ease. The husk wraps around the corn and creates a little steam oven of its own. This keeps every kernel moist and juicy. Add a generous layer of butter, and you have a side dish that everyone will reach for twice.
Roast corn with husk is also incredibly forgiving. Even if you are new to cooking, this recipe is hard to mess up. There are no fancy techniques required. You just soak the corn, add butter, and let the oven do the work. Whether you are cooking for four or fourteen, this method scales up effortlessly.
Key Takeaways
- Husk roasting keeps corn moist: The husk acts as a natural wrapper that traps steam and locks in juices.
- No grill needed: You can get grilled flavor right in your kitchen oven.
- Butter adds richness: Brushing butter inside the husk creates a creamy, flavorful finish.
- Simple prep in under 10 minutes: Soak, butter, and bake. That is it.
- Works for any occasion: Great for weeknight dinners, backyard parties, and holiday meals.
- Customizable seasonings: Add herbs, spices, or cheese for a personal twist.
- Perfect every time: Follow the temperature and timing guide, and you will never burn your corn again.
📑 Table of Contents
- Why Roast Corn In The Oven With Husk
- What You Will Need To Get Started
- Step-By-Step Guide To Roasting Corn With Husk
- Tips For Perfectly Roasted Corn Every Time
- Creative Ways To Serve Your Roasted Corn
- Common Mistakes To Avoid
- Expert Insights On Oven Corn Roasting
- Frequently Asked Questions
- Conclusion
Why Roast Corn In The Oven With Husk
You might wonder why anyone would choose to roast corn on the cob in the oven instead of on a grill. The truth is, oven roasting has some real advantages that make it worth trying.
It Keeps the Moisture Locked In
The husk is a natural barrier. When you roast corn with husk, the steam trapped inside the husk gently cooks the kernels from all sides. This means every bite is tender and juicy. There is no drying out, no tough spots, and no guessing. The corn stays moist even if you leave it in the oven a few extra minutes.
It Gives You That Smoky Charred Flavor
Oven roasting creates a beautiful char on the outside of the husk. When you peel back the husk, you see slightly blackened edges that add a subtle smoky corn flavor. It is not as intense as wood-fire grilling, but it is close. The butter melts into the kernels and carries that smoky taste right to the center.
It Is Way More Convenient
Grilling corn means firing up the grill, waiting for coals to heat, and managing flare-ups. Oven roasting removes all of that hassle. You simply preheat the oven, place the corn on a baking sheet, and set a timer. You can roast a dozen ears at once without crowding a grill grate. This makes oven roasted corn perfect for feeding a crowd.
It Works Year Round
Grilling is a warm-weather activity for most people. But roasted corn in oven works any time of year. It is perfect for winter holidays, rainy afternoons, or busy weeknights when you do not want to heat up the backyard. The oven fits right into your normal cooking routine.
What You Will Need To Get Started
One of the best things about this recipe is how few ingredients you need. You probably already have everything in your kitchen.
The Ingredients
- Fresh corn on the cob — Look for ears with bright green, snug husks. The silk should look moist, not dry and brittle.
- Butter — Unsalted butter works best. You will need enough to brush inside the husk generously.
- Salt — A little kosher salt brings out the natural sweetness of the corn.
- Pepper — Freshly cracked black pepper adds a gentle warmth.
- Optional seasonings — Garlic powder, smoked paprika, fresh herbs like thyme or rosemary, or a sprinkle of parmesan cheese.
The Equipment
- A standard home oven
- A large baking sheet or roasting pan
- Parchment paper or aluminum foil (optional but helpful)
- A pastry brush or spoon for spreading butter
- Kitchen scissors or a sharp knife for trimming husks
You do not need any special tools. If you have an oven and a baking sheet, you are ready to go. The whole process is designed to be simple and low-effort.
Step-By-Step Guide To Roasting Corn With Husk
Here is the heart of the article. Follow these steps closely, and you will have husk roasted corn that is perfectly cooked every time.
Step 1: Prep the Corn
Start by peeling back the husk just enough to remove the silk. Do not pull the husk off completely. Gently peel it back, clean the silk away, and then pull the husk back down over the corn. This keeps the husk in place as a natural wrapper.
If the husk is very dry, soak the entire ear of corn in cold water for 10 to 15 minutes. This helps the husk become pliable and prevents it from burning in the oven. It also adds extra moisture that steams the corn inside.
Step 2: Add the Butter
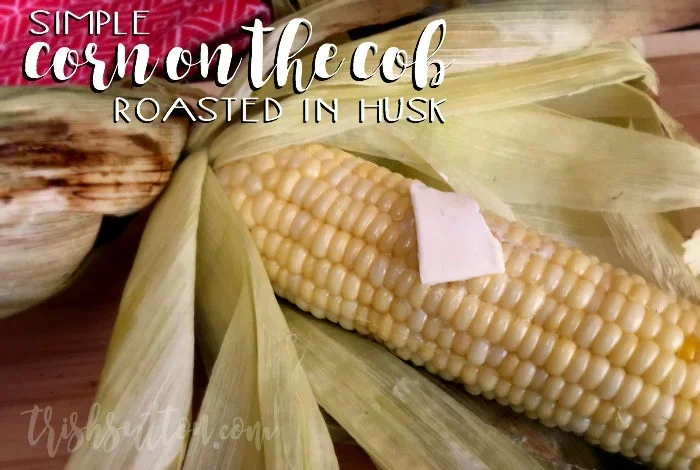
Now comes the fun part. Pull the husk back again carefully. Use a pastry brush or spoon to spread a generous layer of butter directly onto the kernels. Get between the kernels and cover them evenly.
Do not be shy with the butter. This is not the time to go light. The butter melts inside the husk and basts the corn as it cooks. It creates a rich, creamy layer that makes every kernel taste incredible.
Step 3: Season the Corn
Sprinkle salt and pepper over the buttered kernels. If you want to get creative, add a pinch of garlic powder, a dash of smoked paprika, or some fresh chopped herbs. Keep it simple if you prefer. Good butter and salt are all you really need for butter corn that sings.
Step 4: Pull the Husk Back Up
Once the corn is buttered and seasoned, pull the husk back up and over the kernels. Tie the husk ends together with kitchen twine if you want. This step is optional, but it helps keep everything neat and holds the steam inside.
Step 5: Roast in the Oven
Preheat your oven to 400°F (200°C). Place the corn directly on a baking sheet lined with parchment paper or foil. Roast for 25 to 35 minutes. The husk should look slightly charred and dry on the outside.
For charred corn with deeper flavor, try broiling for the last 2 to 3 minutes. Watch it closely so it does not catch fire. A few black spots on the husk are exactly what you want.
Step 6: Rest and Serve
Remove the corn from the oven and let it rest for 3 to 5 minutes. The husk will be hot, so use tongs or oven mitts to handle it. Peel back the husk, add another small pat of butter if you like, and serve immediately.
The kernels should be tender, slightly caramelized, and bursting with flavor. This is roasted sweet corn at its finest.
Tips For Perfectly Roasted Corn Every Time
Once you master the basic method, these tips will help you take your oven roasted corn to the next level.
Choose the Right Corn
Fresh corn tastes best. Look for ears with tight, bright green husks and plump kernels. When you pierce a kernel, the liquid should be milky and clear. Avoid corn with dry, brown husks or shriveled kernels. The fresher the corn, the better the roast corn with husk will turn out.
Do Not Skip the Soak
If your corn husks are dry, soaking them for 10 to 15 minutes makes a big difference. The extra moisture creates more steam inside the husk, which cooks the corn gently and evenly. It also reduces the risk of the husk catching fire in the oven.
Use High Enough Heat
400°F is the sweet spot for corn roasting temperature. Lower temperatures will steam the corn too slowly and make it soggy. Higher temperatures may burn the husk before the kernels cook through. Stick with 400°F for the best balance of char and tenderness.
Let the Corn Rest
After removing the corn from the oven, give it a few minutes to rest. The residual heat continues to cook the kernels slightly, and the butter settles into every crevice. This small pause makes a noticeable difference in texture and flavor.
Experiment With Flavors
Once you are comfortable with the basic recipe, try different flavor combinations. A squeeze of lime and a sprinkle of chili powder makes amazing Mexican-style roasted corn. Parmesan and rosemary give it an Italian twist. Honey and cayenne create a sweet-heat combination that is hard to resist. The possibilities are endless.
Make It Ahead
You can prep the corn up to the roasting stage the night before. Wrap the buttered, seasoned corn in husk and store it in the refrigerator. When you are ready, just pop it in the oven. This is a great trick for summer corn recipe planning when you are entertaining guests.
Creative Ways To Serve Your Roasted Corn
Oven roasted corn is delicious on its own, but it also pairs beautifully with other dishes. Here are some ideas to inspire you.
As a Side Dish
Roasted corn with husk and butter is a perfect side for grilled chicken, steak, or fish. It also goes wonderfully with pasta salads, coleslaw, and baked potatoes. Set a basket of hot corn on the table and let everyone help themselves.
Cut Off the Cob
If you are serving a crowd, consider cutting the kernels off the cob after roasting. Use a sharp knife to slice the kernels into a bowl. Toss them with a little extra butter, herbs, or a squeeze of lemon. This makes a great roasted corn kernels salad or a topping for tacos and grain bowls.
Add It to Soups and Stews
Chopped roasted corn adds incredible depth to chowders, soups, and stews. Stir it in during the last few minutes of cooking so it warms through without turning mushy. It works especially well in creamy corn soup or tomato-based stews.
Make Corn Dip
Blend roasted corn with cream cheese, sour cream, lime juice, and a pinch of cumin. You get a quick and delicious dip that pairs perfectly with tortilla chips. Your guests will never guess it came from the oven.
Common Mistakes To Avoid
Even simple recipes have pitfalls. Here are the most common mistakes people make when they roast corn in the oven with husk, and how to avoid them.
Removing the Husk Completely
The whole point of this method is the husk. If you peel the husk all the way off, the corn will dry out quickly. The husk is your best friend here. Keep it in place and let it do its job.
Using Too Little Butter
Skimping on butter is the fastest way to end up with bland corn. The butter is what carries flavor and creates that luscious, creamy texture. Be generous. Your corn will thank you.
Overcrowding the Baking Sheet
Give each ear of corn some space. If you crowd them together, the steam cannot circulate properly, and the corn will steam instead of roast. Use two baking sheets if you need to roast a large batch.
Ignoring the Broiler
The broiler is your secret weapon for getting that deep, charred corn flavor. Just keep a close eye on it. A few minutes under the broiler at the end of roasting takes your corn from good to outstanding.
Serving Immediately Without Resting
Rushing to serve means the corn is still cooking from residual heat. Give it a few minutes to rest. The kernels will be more tender, and the butter will be evenly distributed. Patience pays off here.
Expert Insights On Oven Corn Roasting
Roasted corn in oven techniques have been refined by chefs and home cooks for years. Here are a few expert tips that elevate the dish from good to great.
Chef Maria Torres, a specialist in seasonal cooking, recommends soaking the corn husks in salted water for an extra 10 minutes before roasting. She says the salt penetrates the husk slightly and seasons the corn from the outside in. It is a small step that makes a real difference in flavor.
Food scientist David Chen explains that the husk actually functions as a natural pressure cooker. The trapped steam raises the internal temperature of the corn gently, which helps break down the starches in the kernels. This is why husk-roasted corn has such a creamy, tender texture compared to corn roasted without the husk.
Another tip from experienced cooks is to place a few whole garlic cloves and a sprig of rosemary inside the husk before closing it up. As the corn roasts, these aromatics release their fragrance and infuse the kernels with subtle flavor. It is an easy upgrade that makes a big impression.
When it comes to corn husk roasting, the quality of your ingredients matters most. Fresh, high-quality corn from a local farm will always outperform supermarket corn. If you have access to a farmers market, grab your corn there. The difference in sweetness and flavor is remarkable.
Frequently Asked Questions
Can I Roast Corn With Husk Without Butter?
Yes, you absolutely can. The husk alone will keep the corn moist and tender. Butter adds richness and flavor, but it is not required. If you skip the butter, just add a little olive oil and salt instead. The corn will still turn out delicious and juicy.
How Long Does It Take To Roast Corn In The Oven With Husk?
At 400°F, most ears of corn need 25 to 35 minutes. Thicker, larger ears may take a few extra minutes. If you like a deeper char, broil for an additional 2 to 3 minutes at the end. Always check for doneness by piercing a kernel with a fork. It should be tender and juicy.
Can I Use Frozen Corn For This Method?
It is best to use fresh corn for roast corn with husk because the husk needs to be moist and pliable. Frozen corn often comes without husks, and the thawing process can make the husk too wet or fragile. If you must use frozen corn, thaw it first and cook it without the husk at 400°F for about 20 minutes.
What Temperature Is Best For Roasting Corn In The Oven?
400°F (200°C) is the ideal temperature. It is hot enough to create a nice char on the husk but not so hot that it burns before the corn cooks through. If your oven runs hot, try 375°F instead. The key is even, steady heat throughout the roasting process.
Can I Prepare The Corn Ahead Of Time?
Yes, you can prep the corn up to 24 hours in advance. Butter and season the corn while the husk is still down, then wrap it tightly in plastic wrap or foil and refrigerate. When you are ready to cook, just place it straight in the oven. You may need to add 5 extra minutes of roasting time if the corn starts cold from the fridge.
How Do I Know When The Roasted Corn Is Done?
Done corn has a few clear signs. The husk will look slightly charred and dry on the outside. When you peel it back, the kernels should be bright and plump. Press a kernel with your fingernail, and the juice should be milky, not clear or watery. If you like your corn more charred, give it an extra 3 to 5 minutes and check again.
Conclusion
How to roast corn in the oven with husk and butter is one of the simplest and most satisfying things you can cook. It requires almost no effort, uses minimal ingredients, and delivers restaurant-quality results right in your own kitchen. The husk does the hard work of keeping the corn moist, while the butter and oven heat create a beautiful char and rich flavor.
This method works for every season and every occasion. Whether you are cooking a quick weeknight side dish or planning a summer gathering, oven roasted corn with husk is always a crowd-pleaser. It pairs with nearly any main course and can be served in countless creative ways.
Now that you know the steps, the tips, and the common pitfalls, you are ready to give it a try. Grab some fresh corn, stock up on butter, and let your oven do the work. Once you taste the difference that husk-roasting makes, you will never go back to boiling or grilling again. Roasted corn with husk is a game changer, and it is waiting for you in your kitchen tonight.